Plotting Labels
So far, most of my tests with the plotter have been unsuccessful, or at least inconsistent.
So I’m going to try pinning down a few of the variables, and working through the HPGL docs with a fine-tooth comb to see if I can get more consistent results.
Making a plotter skeleton sketch
My first task is to make a basic sketch that lets me communicate directly with the plotter, rather than generating HPGL text, which I then send to the plotter separately using a terminal emulator. I think this might help me control the buffer, and reduce errors.
I’m basing this sketch on the bare bones of the Symbolic Disarray sketch.
I also want to make sure that I can see the commands I’m sending to the plotter - and that these two things are the same. So I’m using this kind of format to send the same command to the plotter and the console:
// Make a temporary string variable
String _drawLabel = "SI0.14,0.14;DI0,1;LB" + label + char(3);

// use that variable as the parameter for both outputs
println(_drawLabel);
plotter.write(_drawLabel);
Learning the label commands
This is super-temperamental, so I’m trying to piece this together slowly.
LB
Termination is an issue. From p.26 of the HPGL docs:
Three exceptions to the optional use of the semicolon as an instruction terminator occur in the following instructions: PE (Po- lyline Encoded), LB (Label), and CO (Comment). PE and PG (Advance Full Page) must be terminated by a semicolon. LB is terminated by the non-printing end-of-text character (⇧↵—decimal 3), or a user-defined character. The comment string of the CO instruction must be delimited by double quotes.
So the LB command doesn’t have a semi-colon after it instead using char(3).
However, this supposedly can be overridden with the DT command.
DT
p 65
DT*,1;Define the asterisk character as the label terminator (the “1” indicates that the terminator—the asterisk—shouldn’t be printed). (Don’t leave any spaces before the asterisk.)
However, in my tests, while this character does terminate the label successfully, I can’t get it not to print. (I also tried a 0 instead of a 1.). SO I’m reverting to using the standard control character (3) to terminate the label
Control characters
In normal mode, these are invisible (p.67). I think the alternate mode is for printing special characters. The order is important. In this example, I want to print 2 lines, one under the other. The termaintating charcater for the first line must come after the carriage return and line feed characters
plotter.write("
	PA500,7000;
	LBLine One"
	+ char(13)        // Carriage 13 Return (⇤ )
	+ char(10)        // Line Feed 10 (⌥⌃)
	+ char(3)         // End-of-text(⇧↵)
	+ "LBLine two"
	+ char(3));       // End-of-text(⇧↵)
Or as it’s actually written in the code:
plotter.write("PA500,7000;LBLine One" + char(13) + char(10) + char(3) + "LBLine two" + char(3));
Notice that the PA command is terminated with a semicolon, but the LB commands are terminated with a char(3)
From the docs:
Carriage Return: The pen position is updated to the carriage-return point (usually the pen position when the LB instruction was executed, adjusted by any line feeds).
Line Feed: The pen position and carriage-return point advance one line from their current positions. For HP-GL/2 labels, a line is the character-cell height.
So in this order of commands, after line 1, the pen returns to the beginning of line 1, then drops down a line, then starts line 2.
Changing character size
p.69:
You can change the size of the characters using the SI (Absolute Character Size) and SR (Relative Character Size) instructions. The SI instruction establishes the character width and height in centimeters of the uppercase “A” and maintains this character size independent of the loca- tion of P1 and P2 or the page size. The SR instruction establishes the character width and height of the uppercase “A” as a percentage of the distance between P1 and P2. Subsequent changes in the location of P1 and P2 cause the character size to change with the SR instruction.
Because the SI command changes the size of the the character plot area, and therefore the line height, you need to be careful about the order of commands. In this test, I wanted to print two lines of text; one with square letters, the next with tall letters.
That means you need to insert the carriage return and linefeed characters after you have changed the text size, and inside the second LB command:
String _plottertest2 = "PA200,3700;SI0.3,0.3;LBSquare letters"  + char(3) + "SI0.3,0.5;LB" + char(13) +  char(10) + "Tall skinny letters" + char(3);
println(_plottertest2);
plotter.write(_plottertest2);
Breaking that down into HPGL, and removing the string delimiters from the processing code:
PA200,3700; // move pen to absolute position
SI0.3,0.3; // set character cell to be 0.3cm width and height
LBSquare letters  + char(3) // write the fist line, including label terminator
SI0.3,0.5; // change the text size
LB + char(13) +  char(10) + // start the next label, and move the pen to the next line at this new height
Tall skinny letters + char(3) // write and terminate the second label

In this image, the tests run from bottom to top. In the first (lowest), the lines are two close together, because I didn’t change the text size before I started a new line. In the second, the text all flows on one line because I put the CR and LF characters outside the LB command. The third (top) test uses the correct code above
Slanting text - italics
p.301
To specify the slant at which labels are drawn using scalable or stick fonts. Use SL to create slanted text for emphasis, or to re-establish upright labeling after an SL instruction with param- eters has been in effect. (Note that the SL instruction has no effect when using bitmap fonts, that is, when an “SB1;” instruction is in effect.)
Syntax:
SL tangent_of_angle[;]orSL [;]
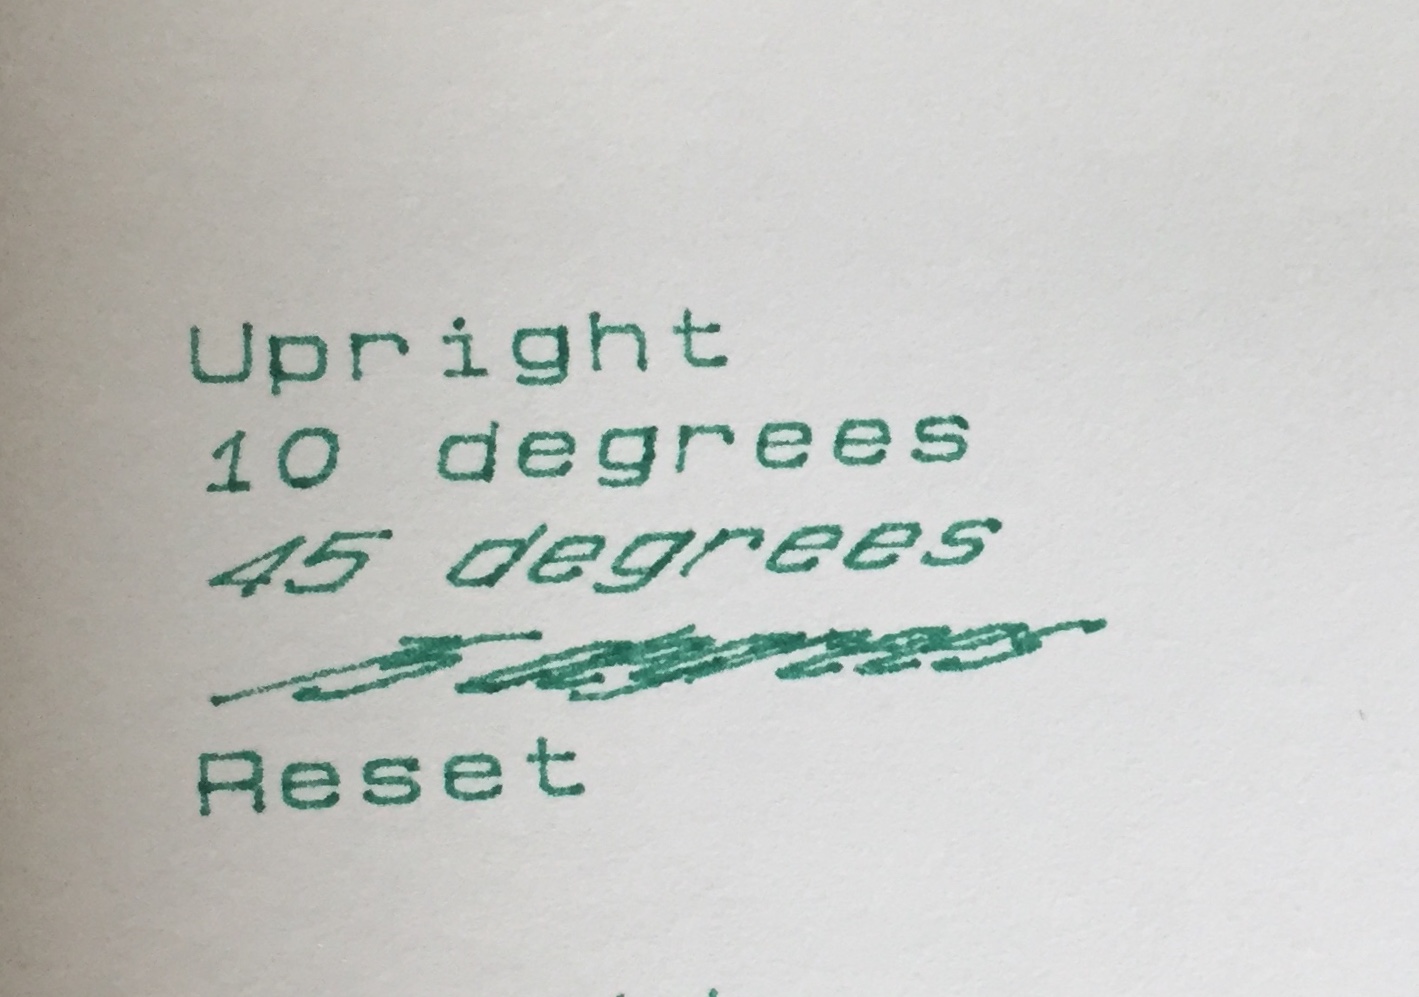
The value you set is the tangent of the angle you want. For a 0° slant, that’s 0. For 45°, that’s 1. As you approach 90°, that approaches infinity (though almost all usable values are less than 1).
Here’s a test:

And here’s the code:
String _plottertest3 =
	"PA200,6700;SI0.2,0.2;LBUpright" + char(13) +  char(10)  + char(3) +
	"SL0.176;LB10 degrees" + char(13) +  char(10) + char(3) +
	"SL1;LB45 degrees" + char(13) +  char(10) + char(3) +
	"SL03.73;LB75 degrees" + char(13) +  char(10) + char(3) +
	"SL0;LBReset" + char(3);

println(_plottertest3);
plotter.write(_plottertest3);
Note that you have to reset the slant angle once you’re done with italics.
Changing the typeface
p.480
The typeface characteristic selects the font’s design style, which gives the font its distinctiveness. Typefaces can only be printed if the device has access to them; if they are internal fonts, are soft fonts that are downloaded to the device, or if they reside in a font cartridge or single inline memory module (SIMM) that is plugged into the device. All HP-GL/2 devices support the stick fonts (48, 49, and 50).
Those fonts are:
48 Stick (default)
49 HP-GL drafting
50 HP-GL fixed arc
I don’t know if it’s possible to load other fonts onto my plotter.
These fonts are defined on p.60:
Stick and Arc Fonts — Characters are drawn as a series of vectors. The characters are defined as a set of end-points. You can resize (using SI or SR), rotate (using RO, DI, and DR), and distort (using SL) stick fonts. Stick fonts are defined on a dimensionless grid. The main body of each character fits within a 32-by-32-unit box, with descenders extend- ing beneath. The stick font is fixed-spaced, and the arc font is proportionally-spaced. All HP-GL/2 devices support stick fonts.
…
Fixed-Arc Font — The horizontal space for all characters is the same. Characters are drawn using arcs for greater smoothness.
Drafting Font — Characters are designed to provide reliable character recognition in situations where photo reduction may cause image degradation and loss of resolution. The characters are drawn in such a way as to avoid confusion between lines and figures. Thus the letter “B” and the digit “8” have a wider bottom than top part, but the “8” has a full, round shape to avoid blur. The digits “6” and “9” have large bodies, but with open stems. The set also includes symbols used in drafting, such as � and �. The HP Drafting font is a fixed-space vector font.
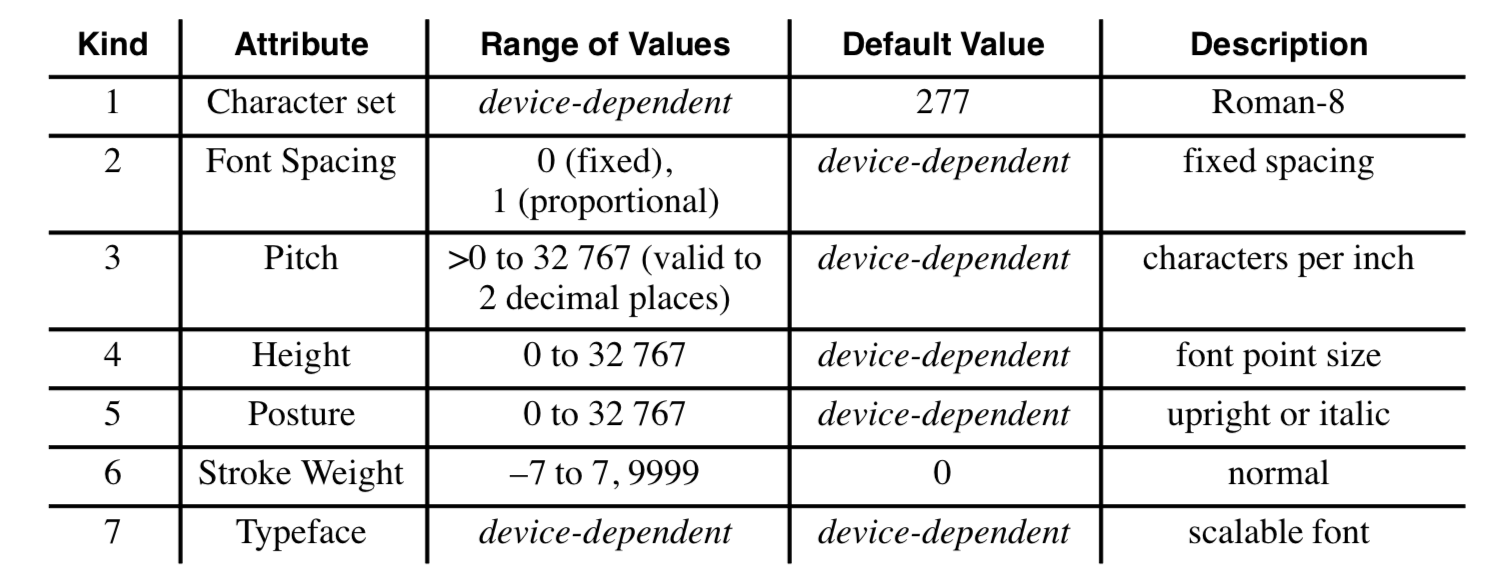
Note that SD can take lots of parameters. From p.297:

HOwever, I can’t get this to work yet…